Building TF-A Tests
Before building TF-A Tests, the environment variable
CROSS_COMPILEmust point to the cross compiler.For AArch64:
export CROSS_COMPILE=<path-to-aarch64-gcc>/bin/aarch64-none-elf-
For AArch32:
export CROSS_COMPILE=<path-to-aarch32-gcc>/bin/arm-eabi-
It is possible to build TF-A Tests using clang (currently AArch64 only). To do so
CCneeds to point to the clang binary. Only the compiler is switched; the assembler and linker need to be provided by the GNU toolchain, thusCROSS_COMPILEshould be set as described above.clang will be selected when the base name of the path assigned to
CCcontains the string ‘clang’.For AArch64 using clang:
export CROSS_COMPILE=<path-to-aarch64-gcc>/bin/aarch64-none-elf-
make CC=<path-to-clang>/bin/clang PLAT=<platform> tftf
Currently, the following TF-A Tests targets are supported for clang build:
tftf, ivy, realm, cactus, cactus_mm, ns_bl1uChange to the root directory of the TF-A Tests source tree and build.
For AArch64:
make PLAT=<platform>
For AArch32:
make PLAT=<platform> ARCH=aarch32
Notes:
If
PLATis not specified,fvpis assumed by default. See the TF-A documentation for more information on available build options.By default this produces a release version of the build. To produce a debug version instead, build the code with
DEBUG=1.The build process creates products in a
build/directory tree, building the objects and binaries for each test image in separate sub-directories. The following binary files are created from the corresponding ELF files:build/<platform>/<build-type>/tftf.binbuild/<platform>/<build-type>/ns_bl1u.binbuild/<platform>/<build-type>/ns_bl2u.binbuild/<platform>/<build-type>/el3_payload.binbuild/<platform>/<build-type>/cactus_mm.binbuild/<platform>/<build-type>/cactus.binbuild/<platform>/<build-type>/ivy.bin
where
<platform>is the name of the chosen platform and<build-type>is eitherdebugorrelease. The actual number of images might differ depending on the platform.Refer to the sections below for more information about each image.
Build products for a specific build variant can be removed using:
make DEBUG=<D> PLAT=<platform> clean
… where
<D>is0or1, as specified when building.The build tree can be removed completely using:
make realclean
Use the following command to list all supported build commands:
make help
TFTF test image
tftf.bin is the main test image to exercise the TF-A features. The other
test images provided in this repository are optional dependencies that TFTF
needs to test some specific features.
tftf.bin may be built independently of the other test images using the
following command:
make PLAT=<platform> tftf
In TF-A boot flow, tftf.bin replaces the BL33 image and should be
injected in the FIP image. This might be achieved by running the following
command from the TF-A root directory:
BL33=<path/to/tftf.bin> make PLAT=<platform> fip
Please refer to the TF-A documentation for further details.
Realm payload test image
realm.bin is the realm payload test image and is packaged along with
tftf for Realm Management Extension (RME) testing. This can be built using
the following command:
make PLAT=<platform> ENABLE_REALM_PAYLOAD_TESTS=1 tftf
The generated realm.bin is packaged as part of tftf.bin
to be used as a single BL33 image.
Please refer to the TF-A RME documentation for build and run instructions.
NS_BL1U and NS_BL2U test images
ns_bl1u.bin and ns_bl2u.bin are test images that exercise the Firmware
Update (FWU) feature of TF-A [1]. Throughout this document, they will be
referred as the FWU test images.
In addition to updating the firmware, the FWU test images also embed some tests that exercise the FWU state machine implemented in the TF-A. They send valid and invalid SMC requests to the TF-A BL1 image in order to test its robustness.
NS_BL1U test image
The NS_BL1U image acts as the Application Processor (AP) Firmware Update
Boot ROM. This typically is the first software agent executing on the AP in the
Normal World during a firmware update operation. Its primary purpose is to load
subsequent firmware update images from an external interface, such as NOR Flash,
and communicate with BL1 to authenticate those images.
The NS_BL1U test image provided in this repository performs the following
tasks:
Load FWU images from external non-volatile storage (typically flash memory) to Non-Secure RAM.
Request TF-A BL1 to copy these images in Secure RAM and authenticate them.
Jump to
NS_BL2Uwhich carries out the next steps in the firmware update process.
This image may be built independently of the other test images using the following command:
make PLAT=<platform> ns_bl1u
NS_BL2U test image
The NS_BL2U image acts as the AP Firmware Updater. Its primary
responsibility is to load a new set of firmware images from an external
interface and write them into non-volatile storage.
The NS_BL2U test image provided in this repository overrides the original
FIP image stored in flash with the backup FIP image (see below).
This image may be built independently of the other test images using the following command:
make PLAT=<platform> ns_bl2u
Putting it all together
The FWU test images should be used in conjunction with the TFTF image, as the latter initiates the FWU process by corrupting the FIP image and resetting the target. Once the FWU process is complete, TFTF takes over again and checks that the firmware was successfully updated.
To sum up, 3 images must be built out of the TF-A Tests repository in order to test the TF-A Firmware Update feature:
ns_bl1u.binns_bl2u.bintftf.bin
Once that’s done, they must be combined in the right way.
ns_bl1u.binis a standalone image and does not require any further processing.ns_bl2u.binmust be injected into theFWU_FIPimage. This might be achieved by settingNS_BL2U=ns_bl2u.binwhen building theFWU_FIPimage out of the TF-A repository. Please refer to the section Building FIP images with support for Trusted Board Boot in the TF-A documentation.tftf.binmust be injected in the standard FIP image, as explained in section TFTF test image.
Additionally, on Juno platform, the FWU FIP must contain a SCP_BL2U image.
This image can simply be a copy of the standard SCP_BL2 image if no specific
firmware update operations need to be carried on the SCP side.
Finally, the backup FIP image must be created. This can simply be a copy of the standard FIP image, which means that the Firmware Update process will restore the original, uncorrupted FIP image.
EL3 test payload
el3_payload.bin is a test image exercising the alternative EL3 payload boot
flow in TF-A. Refer to the EL3 test payload README file for more details
about its behaviour and how to build and run it.
SPM test images
This repository contains three sample Secure Partitions (SP) meant to be used with one implementation of a Secure Partition Manager (SPM):
Cactus-MM
Cactus and Ivy
They are only supported on AArch64 FVP. They can be built independently of the other test images using the following command:
make PLAT=fvp cactus ivy cactus_mm
To run the full set of tests in the Secure Partitions, they should be used in conjunction with the TFTF image.
Please refer to the TF-A documentation for further details.
Cactus-MM
Cactus-MM is designed to test the TF-A EL3 SPM implementation (TF-A Secure Partition Manager (MM)) based on the Arm Management Mode Interface (MM)
This SP runs in Secure-EL0 and performs the following tasks:
Test that TF-A has correctly setup the secure partition environment: it should be allowed to perform cache maintenance operations, access floating point registers, etc.
Test that TF-A accepts to change data access permissions and instruction permissions on behalf of the Secure Partition for memory regions the latter owns.
Test communication with SPM through MM interface.
In the TF-A boot flow, the partition replaces the BL32 image and should be
injected in the FIP image. To test SPM-MM with Cactus-MM, it is enough to use
cactus_mm.bin as BL32 image.
For SPM-MM, build TF-A following Building TF-A Secure Partition Manager (MM) and the following commands can be used to build the tests:
# TF-A-Tests repository:

make PLAT=fvp TESTS=spm-mm tftf cactus_mm
Cactus and Ivy
Cactus and Ivy are designed to test the FF-A based SPM implementation with secure virtualization enabled. Refer to Arm Firmware Framework for Armv8-A
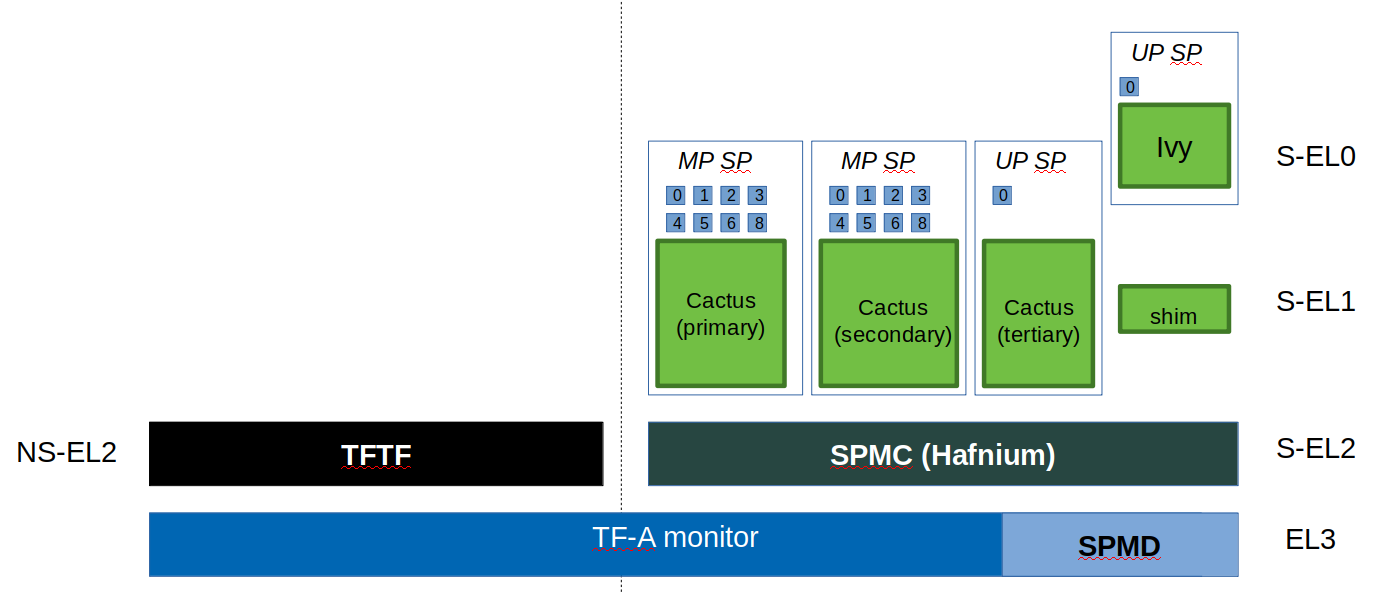
In the TF-A reference code base, BL31 implements the SPMD and BL32 the SPMC. The SPMC runs at S-EL2 and acts as a partition manager for multiple secure partitions (TF-A Secure Partition Manager (FF-A)):
Cactus is a sample FF-A compliant S-EL1 partition. As a matter of providing a realistic test harness, three instances of the same partition binary are launched as separate SPs (hence assigned three different FF-A IDs corresponding each to a different secure partition). Each secure partition instance has a separate manifest (Cactus sample manifest, Cactus secondary manifest, Cactus tertiary manifest ). First two instances are MP SPs. Third instance is a UP SP. Each instance runs a set of built-in tests at boot time. They exercise SP to SPMC FF-A interfaces contained in the secure world. The partition interacts with the SPMC through SMC. Once the NWd and TFTF are started, another set of run-time tests exercise the normal world to secure world primitives.
Ivy is a specific kind of S-EL1 UP partition, where the S-EL1 exception level consists of a thin shim layer. The applicative part of the partition is held at S-EL0. The shim provides early bootstrap code, MMU configuration and a vector table trapping S-EL0 requests. The application interacts with the shim through FF-A protocol by the use of SVC instruction. The shim relays the request to the SPMC by an SMC. The S-EL0 application doesn’t require knowledge of the shim, and can be self contained.
This picture illustrates the test setup:
To build TFTF with SPM tests, Cactus and Ivy use:
# TF-A-Tests repository:

make PLAT=fvp TESTS=spm tftf cactus ivy
Copyright (c) 2019-2021, Arm Limited. All rights reserved.